
Menu without ActionScript
With my friend-SWF Quicker, you can create excellent navigation even without ActionScript though it is a bit complex here.
Series: SWF Quicker 2.0
1. Launch SWF Quicker. Set movie's width as 760; height as 105; frame rate as 60.
2. Draw a line on the canvas, set its line width as 1, color is gray.

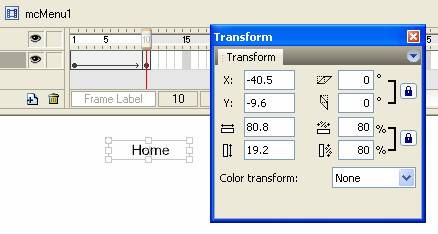
3. Create a new movie clip and name it mcMenu1, write characters “Home” on the canvas and set its properties as following: font: Arial; font size: 14; font type: static; align: align center. Insert a keyframe in frame 10. Reduce the text size to 80%. Please notice to adjust text position about (0, 0). After that, create motion tween between frame 1 and 10.
4. Add ActionScript in frame 10:
| Code: |
| stop(); |
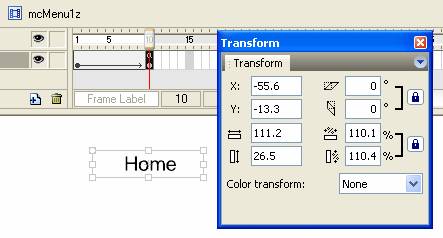
5. Make a copy of mcMenu1 and rescale text size to 110% in Transform panel. Please notice to adjust text position about (0, 0).
TIP: to get a copy of a symbol, Right-click mcMenu1 in the library and choose copy in context menu, then right-click any place of library and choose paste.
6. Create a button and name it btnMenu1. In frame up, drag mcMenu1 to stage. In frame Over and Down, drag mcMenu1z to stage. Draw a rectangle the same size with the characters to define the area of the button that responds when clicked.
7. We have finished one button, another six named btnMenu2 btnMenu3 btnMenu4…btnMenu7 are needed respectively. They represent “Sample”, “ActionScript”, “Tutorials”, “Photograph”, “Diary” and “Download”.
8. Now, we start to make content of the scene. Convert the gray line in mentioned in step 2 to MC and name it group. Double-click it to enter editing-mode.
9. Insert a keyframe in frame5 and drag gray line to position (200, 0). Insert a keyframe in frame 345.
10. Insert a new layer, insert a keyframe in frame 2 and drag the gray line from library to stage-(0, 0). Insert a keyframe in frame 6 and drag the gray line from library to stage-(300, 0)
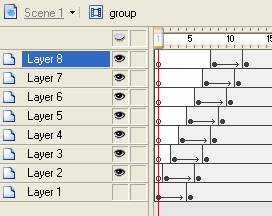
11. Repeat the above method to create 6 layers. Start-stop frame of gray line were back forward a frame in each layer in turn. The interval is 100 pixels.
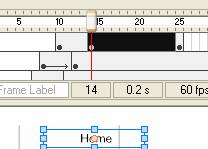
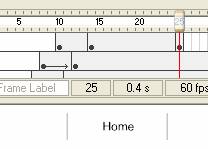
12. Insert a new layer. Insert a keyframe in frame 10. Drag btnMenu1 to stage and position it on the left of first gray line. Insert keyframe in frame 14 and 25 respectively. In frame 14, remember to position it between the two intervals and nearer to the second one. In frame 25, please remember to place btnMenu1 in the middle of two intervals.
Timeline in frame 14:
Timeline in frame 25:
13. Use this method to lay out these seven buttons, extend the frames of each button layer to 54 frames. Add a layer AS and insert a keyframe in frame 54, add ActionScript as follows:
| Code: |
| stop(); |
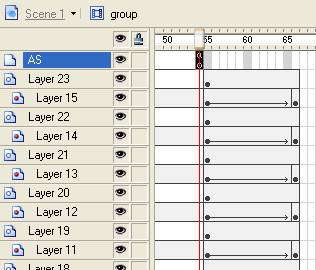
14. We use mask to make the sub-buttons appearing the same time. We make a mask motion between frame 55 and 66 to let the buttons come out.
15. We are now to make single sub-button’s appearing effect. All of the sub-buttons are visible when they first step into your eyes, but only the one you place cursor on is visible while others are disappear. See more details, you can download the source files at the end of this lesson.
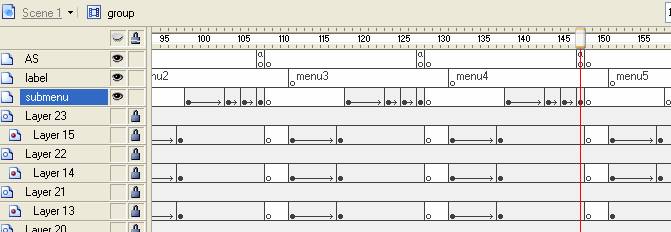
16. We are now to add ActionScript to each sub-button, for instance, to add the following ActionScript which means to play a specific frame when cursor over the button in the Home button. Other buttons are the same but only frame tagging.
| Code: |
| on(rollOver) { gotoAndPlay("menu1"); } |
17. Insert a new layer above layer submenu; create a transparent button in this layer as hit area. The play head back to frame tagging-allmenu when mouse rolls out of button
| Code: |
| on(rollOut) { gotoAndPlay("allmenu"); } |
18. Finally, Please adjust the position of the gray line to (-200. 40) to let the menu display completely.
See more details, you can download the source files from menunoas.rar (16.05 KB).